

Bathrooms are tricky to light up. Steam, mirrors, and eyebrow-plucking precision demand lighting that actually works.
Enter bathroom downlights. Sleek, steam-proof, and seriously flattering, they turn your bathroom from “meh” to “wow” with one smart switch.
Want to learn more? This guide breaks down everything you need to know about bathroom downlights, from special considerations to combining style and function.
Why Bathroom Lighting Needs Special Consideration
Installing bathroom lights may seem simple at first glance (and it mostly is). However, keep in mind that it requires a few special considerations.
Water and Electricity Don’t Mix
Sounds like common sense, right? Yet many people still get it wrong somehow. The bathroom is a wet zone. Don’t risk turning a relaxing soak into a shock hazard.
Strict UK Regulations Apply
The UK has clear rules for a reason. You can’t just pop in any light fitting. Each bathroom zone has its own standards, and they’re non-negotiable.
High Moisture Can Damage Fixtures
Even without direct splashes, steam is relentless. Use the wrong fixture and your lights won’t just look tired; they might stop working altogether.
Proper Placement Impacts Safety
A safe fitting in the wrong spot is still a problem. Too close to the shower? You’re gambling with water and wiring.
Bathrooms Need Multiple Lighting Zones
Your morning routine and midnight toilet trips need different vibes. Downlights let you mix bright, practical light with something softer when you need it.
Design Matters in Small, Reflective Spaces
Mirrors, tiles, glass—light bounces everywhere. Without a plan, you end up with glare, weird shadows, or worse.
What Are IP-Rated Downlights?
Now that you know bathroom lighting isn’t a free-for-all, let’s talk about what actually makes a light “bathroom safe.”
IP ratings (short for Ingress Protection) tell you how resistant a light fitting is to dust and water. In a steamy, splash-happy room like a bathroom, this rating matters. A lot.
Here’s a quick breakdown:
- IP44 – Splashproof. Fine for the outer zones where water won’t hit directly.
- IP65 – Waterproof enough to handle jets from any direction. Perfect for ceiling lights near showers.
- IP67 – Fully submersible. Great for underwater lights. Not so necessary unless your bath is doubling as a fish tank.
IP65 is the Goldilocks of bathroom lighting—not too weak, not overkill. It holds up to steam, splashes, and still looks sleek while doing it.
Splashproof is fine for sinks and mirrors. But near your shower or bath? You’ll need waterproof. Don’t try to save a tenner and end up with a fried fitting.
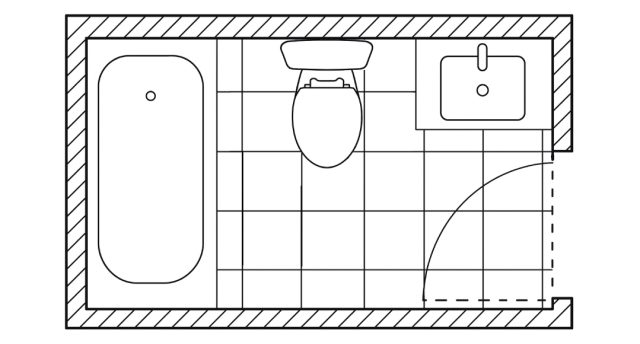
Bathroom Lighting Zones Explained
So now you know what IP ratings mean. But where you place each light matters just as much as how waterproof it is.
Bathrooms are split into zones. These zones are based on how close the fitting is to water. Each zone has its own rules, and your lights need to follow them.
- Zone 0 – Inside the shower or bath itself. Only very low-voltage lights (12V max) with an IP67 rating are allowed here. Yes, inside the bath. Think LED strip lights under the waterline.
- Zone 1 – The space directly above a bath or shower, up to 2.25 metres high. This is splash central. You’ll need at least IP65 fittings here.
- Zone 2 – The area stretching 60cm outside the bath or basin. IP44 is the minimum here, but honestly, IP65 is still better.
- Outside Zones – Everything else. It might seem like a “safe zone,” but moisture floats. Stick with IP44 or higher to be safe and compliant.
Common Mistakes to Avoid
Here are some of the usual slip-ups people make when dealing with bathroom lighting zones:
- Choosing the wrong IP rating for the zone.
- Guessing zone boundaries instead of measuring correctly.
- Ignoring ceiling height. Yes, it affects the zone!
- Installing non-rated fittings in splash zones.
- Assuming “it’ll probably be fine.” (It won’t.)
Always double-check before you buy or install anything. A five-minute check now saves a costly mistake later.
Best LED Downlights for Bathrooms
Next, let’s talk about which bathroom downlights are actually worth buying.
What to Look For
Aside from the IP65 rating, keep an eye out for these five features:
- Beam angle – Wide angles for general light, narrow ones to spotlight specific areas.
- Colour temperature – Warm for ambience, cool for clarity. Mix and match depending on the space.
- Dimmability – Great for setting the mood (or saving your eyes during late-night bathroom trips).
- Energy efficiency – LED is the clear winner here. Lower bills, longer lifespan.
- Fire rating – A must for ceilings below lofts or upper floors. Safety first!
Warm White vs Cool White
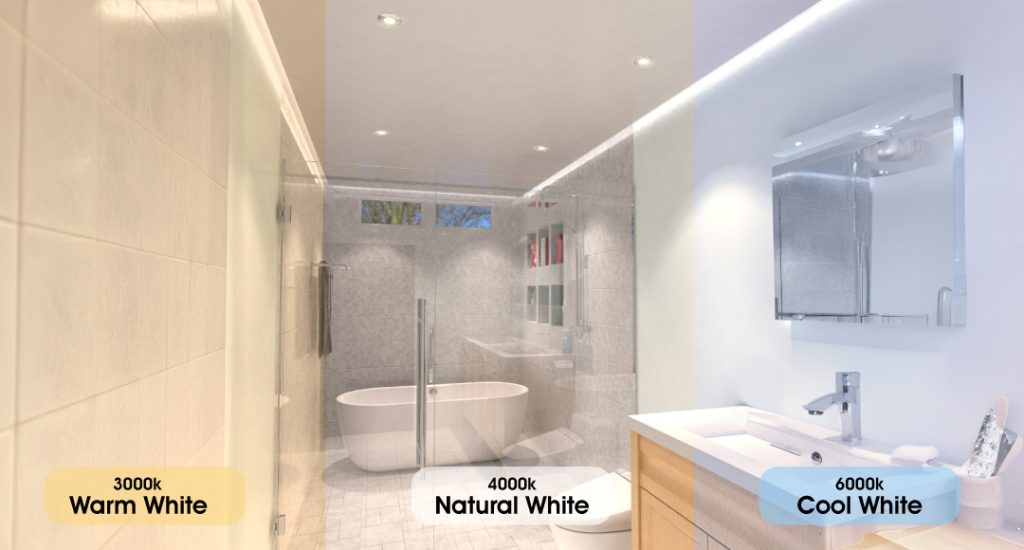
Warm white lighting gives your bathroom a cosy, relaxing glow. It’s ideal for unwinding in the bath or setting a chill vibe.
Meanwhile, cool white is bright and crisp, perfect for tasks like shaving or applying makeup. Many people mix both depending on the zone.
Top Picks in the UK
Some of the highest-rated IP65 bathroom downlights include:
- Simple Lighting IP65 LED Downlights – Affordable, easy to install, and properly rated.
- Aurora M10 – Dimmable, fire-rated, and available in multiple finishes.
- Integral LED Evofire – Slim profile, low glare, great for low ceilings.
Installing Bathroom Downlights Safely
Choosing the right downlight is just half the job. Installing it properly is where things really matter. Here are five tips to keep your installation stress-free (and spark-free):
Call in a Pro
Bathroom wiring isn’t a DIY moment. Unless you’re a qualified electrician, step away from the wires.
Choose Fire-Rated Fittings
Especially if your bathroom’s below another floor. These downlights help contain fire and meet UK building regs.
Make Sure Fittings are Moisture-Resistant
Even with the right IP rating, not all fittings are built to withstand the rigours of steam-heavy spaces. Check the specs.
Map Out Your Layout First
Don’t wing it. Use a plan to avoid glare bombs over your mirror or dark spots in the shower.
Use Proper Insulation Guards
If your fittings are recessed, they need space to breathe. Let them overheat and you’re looking at early burnout—or worse.
Where to Place Downlights in a Bathroom
Now let’s figure out exactly where those shiny new lights should go for maximum glow and zero regrets.
Over Showers and Bathtubs
This is Zone 1 territory, so you’ll need IP65-rated downlights. Place one directly above the shower-head or centre it over the bath.
Above Mirrors and Sinks
You need clear, focused light here. Angle your downlights slightly forward or pair with a mirror light to avoid spooky shadows.
Near the Toilet Area
It’s often overlooked, but adding a soft downlight near the loo makes night-time visits safer and much less blinding.
General Ceiling Layout
Aim for even spacing (roughly 1 metre apart). Avoid clustering them or leaving dark patches in corners.
Avoid Glare Zones
Don’t place a downlight directly above your head when standing at the mirror. No one wants an accidental horror movie effect.
Combining Style with Function
Downlights aren’t just practical. They can actually look good too, if you know how to match style with substance.
Choose the Right Finish
White for a clean look, chrome for a bit of shine, and black for a bold, modern vibe. Match your fixtures and fittings.
Go Dimmable
Dimmable LEDs give you flexibility—bright when you need it, low and cosy when you don’t. Perfect for winding down at night.
Match Your Accessories
Downlights don’t have to work alone. Coordinate them with your mirror, extractor fan, or even tapware for a sleek, unified look.
Pick the Right Shape and Trim
Some downlights sit flush, others have a slight drop. Choose based on ceiling height and the look you’re going for (modern, minimal, or classic).
Balance Looks with IP Rating
Style’s important, but don’t forget function. That ultra-slim downlight still needs to be IP65-rated if it’s going near the shower.
Your Bathroom Deserves Better Lighting
Your bathroom needs lighting that’s safe, stylish, moisture-resistant, and zone-approved. Downlights do all of that, all while still managing to look sharp.
You now know why IP ratings matter, where each light should go, how to install them safely, and how to match them with your design style. No more guessing, no more glare bombs, and definitely no more steamy ceiling disasters.


